Wireless 101: how Wi-Fi signal really travels
Start from zero. Radio waves, dB and dBm, the 2.4, 5 and 6 GHz bands, antenna patterns in 3D, what walls and distance do to a signal, where to put access points, and how a laptop picks one and roams. Interactive 3D views you can turn and point at, and nothing to install.
Wi-Fi is the part of the network you can’t see, which is why it’s the part people guess about. This course makes the signal visible. You’ll turn antenna patterns around in 3D, watch a signal fade through walls, move access points up and down, and walk a laptop through an office to see which access point it picks and when it gives up on one.
There’s nothing to install. Every lesson runs in your browser.
How each lesson works
Every lesson has the same five parts, so you always know where you are:
- Explain: the idea, in plain words, with an everyday comparison.
- Show: a picture of it, every part named.
- Follow along: a 3D view or a step-by-step diagram, with something to look for at each step.
- Challenge: a puzzle to try on your own. Hints if you need them, then the answer.
- Check: a few quick questions, with the reason behind each answer.
Start with the numbers
Two small tools come first, for lessons 1 and 2. They’re flat, not 3D, and they work on any screen.
The first is the dB ladder. Wi-Fi signal is counted in dBm, decibels compared with one milliwatt, because the numbers involved run from a tenth of a watt down to a millionth of a millionth of one. In dB you add and subtract instead of multiplying: +3 dB doubles the power, +10 dB is ten times it.
This tool needs JavaScript. The text below covers the same ideas.
Slide the power to see mW and dBm side by side, or use the buttons: every +3 dB doubles the power and every +10 dB multiplies it by ten.
Underneath is a link budget, the sum every Wi-Fi engineer does in their head. A 17 dBm access point loses 1 dB in its cable, gains 3.7 dBi from a ceiling antenna, and loses about 68 dB crossing 40 ft of air on 5 GHz, so a laptop gets about −49 dBm. Add a drywall wall and it drops 4 dB; add concrete and it drops about 26 dB. The green line is the −67 dBm target for voice and video calls, and the red one is the noise floor.
The second is the channel strip. Each band is cut into channels, and two access points near each other should use channels that don’t overlap.
This tool needs JavaScript. The text below covers the same ideas.
Six access points start on 2.4 GHz at 20 MHz, on channels 1, 3, 6, 6, 9 and 11. Channel 3 overlaps both 1 and 6, and 9 overlaps 6 and 11: partly overlapping channels hear each other as noise, which is worse than sharing a channel outright. In the US, 2.4 GHz has only three channels that don’t overlap: 1, 6 and 11.
Switch to 5 GHz and there are 25 at 20 MHz, but only 6 at 80 MHz and 2 at 160 MHz: wider channels are faster and there are fewer of them. Channels 52 to 144 are DFS channels, where an access point has to listen for radar first. 6 GHz has 59 at 20 MHz and 7 at 160 MHz, for Wi-Fi 6E and Wi-Fi 7 devices.
Using the 3D views
Drag to turn a view, and scroll or pinch to zoom. Point at anything (or tap it on a phone) to read the number behind the color. On a keyboard, Tab to the view, then use the arrow keys to turn it and + and − to zoom.
Here’s the first one. It’s an antenna’s radiation pattern: how strongly it sends in each direction.
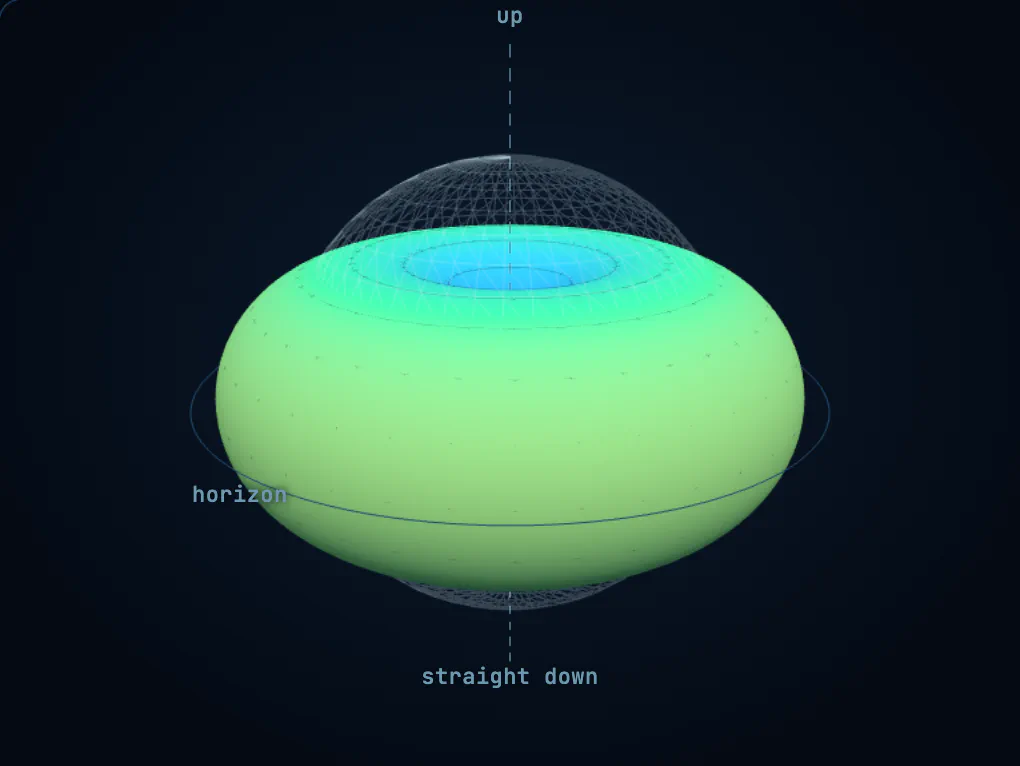
The farther the surface reaches in a direction, the stronger the antenna sends that way. An upright dipole (the classic stick antenna) makes a donut: 2.15 dBi all the way around the horizon, and almost nothing straight up or straight down. That hole is why a client directly under some access points gets a weaker signal than one a few feet away.
The faint sphere is 0 dBi, an imaginary antenna that sends equally everywhere. Wherever the pattern pokes outside it, the antenna is stronger than that yardstick; wherever it dips inside, weaker. Switch to the high-gain omni or a patch and watch the same power get squeezed into a flatter donut or a beam. Gain is focus, not extra power.
The 3D shape shows reach: how far the signal gets in each direction before it fades to the same level. The two flat plots underneath show the same pattern the way an antenna datasheet prints it, in dB: one slice seen from above, one from the side.
The patterns are ideal shapes worked out from the antennas’ physics, not a particular product’s datasheet. Lesson 3 says what real ones add.
The signal lab
Lessons 4 to 6 happen on this floor: a 100 by 66 foot office with drywall offices, a concrete core with a metal elevator shaft, a block-walled storage room, and a conference room behind coated glass. It starts with one ceiling access point at 10 feet on 5 GHz.
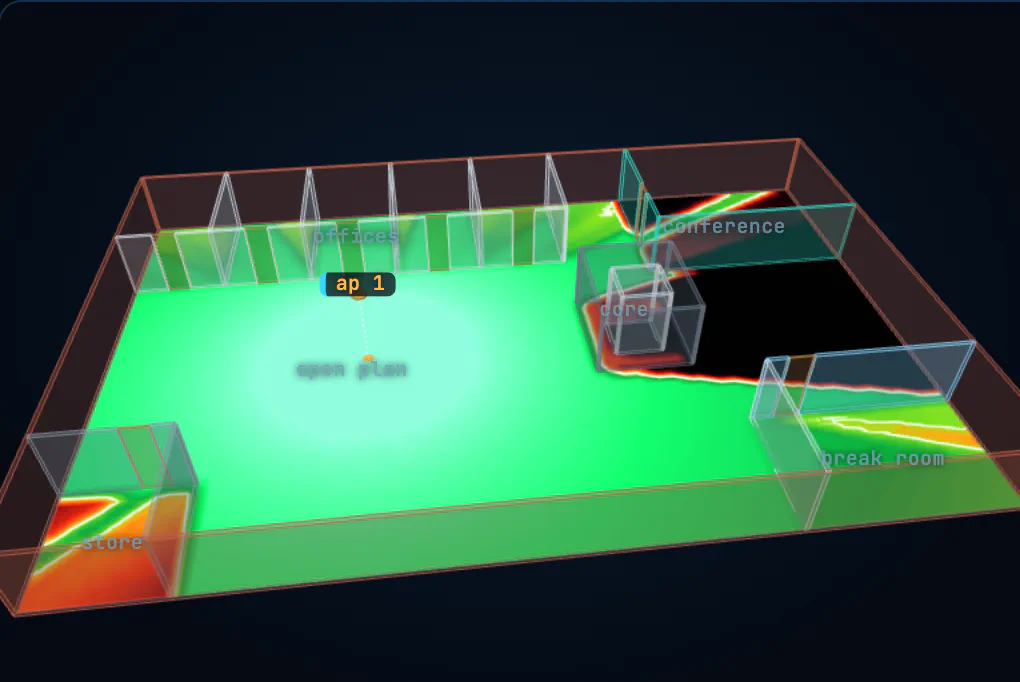
The colors are the signal a laptop on a desk would get from the strongest access point, in dBm. The white line is −67 dBm, the usual design target for voice and video calls: inside it, calls work; outside it, they start to break up.
Two things stand out straight away. The concrete core and the metal elevator shaft throw a shadow behind them. And the conference room in the top right corner is dark, even though its walls are glass. It’s coated (low-E) glass, which keeps heat out and blocks about 24 dB of signal, about as much as a concrete wall.
Drag the access point around, add more, change the band, the antenna and the height, or click any wall to change what it’s made of. Click the floor and the panel shows where the number comes from: the transmit power, the antenna’s gain toward you, the loss through the air, and every wall in the way.
The model counts the direct path and the walls it crosses. It leaves out reflections and signal bending round corners, so the shadows here are a little darker than real ones.
Walking a laptop through it
Lesson 6 adds a laptop. It’s the laptop, not the access points, that decides which access point to use and when to move to another one, which is called roaming. The laptop sticks with its access point until the signal drops below its roam threshold, and then it moves only to one that’s better by a margin (engineers call it hysteresis), so it doesn’t bounce between two access points of about the same strength.
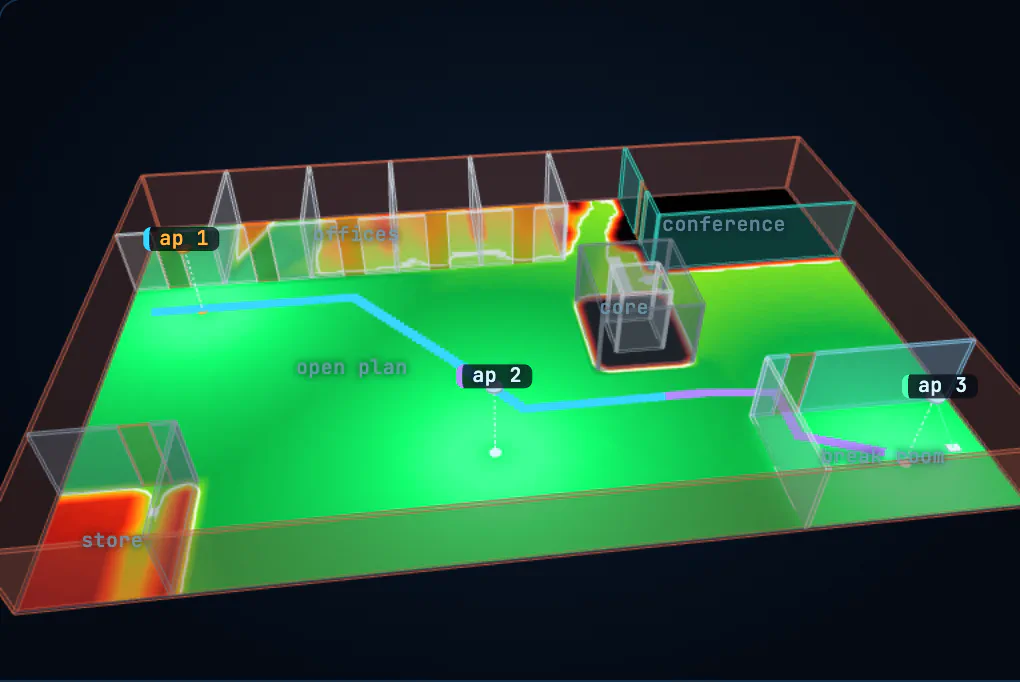
Three access points, turned down to 5 dBm the way a busy office often is, and a laptop at the start of a walk. Press Walk the path and the laptop walks to the break room. The trail on the floor and the thick line on the graph show which access point it’s using, and the dotted lines mark each roam.
With the roam threshold at −70 dBm, the laptop hands over from AP 1 to AP 2 to AP 3 and never gets much weaker than −71 dBm. Lower the threshold to −75 dBm and walk again. Now it clings to AP 1 all the way to the break room door, where the signal collapses to around −110 dBm before it gives up. That’s a sticky client, one of the most common Wi-Fi complaints, and it’s a setting on the laptop, not a fault in the access points.
Set the margin to 0 and the threshold high, around −55 dBm, and the small wobble every real signal has makes the laptop flap between access points. That’s what the margin is for.
The guided lab
Eight tasks on the same floor, each with a goal the lab checks for you, hints if you get stuck, and the answer if you want it. Each task resets the floor to its own starting point, and your progress is kept in this browser.
- Find the hole under the AP. Find the weakest spot near a dipole hung 20 ft up.
- Fill in the hole. Get −67 dBm straight under that dipole without moving it sideways.
- Which walls cost the most? Rank drywall, clear glass, coated glass and concrete on 2.4 and 5 GHz. The order isn’t the same on both.
- Good on 2.4, not on 5. Find a spot that one access point covers on 2.4 GHz but not on 5 GHz.
- Cover the office. Get 95% of the floor to −67 dBm on 5 GHz with three access points or fewer.
- Light up the conference room. Get signal into the room behind the coated glass without adding an access point.
- Make a sticky client. Set the laptop so it hangs on to a far access point.
- Tune the roaming. Keep the signal above −72 dBm on the walk, without flapping.
What you’ll be able to do
- Read a signal strength like −67 dBm and know whether it’s good enough for a video call.
- Pick channels on 2.4, 5 and 6 GHz that don’t step on each other.
- Read an antenna datasheet and picture the shape in the room.
- Predict roughly what a wall will do to a signal before you measure it.
- Place access points for an office and a warehouse, and explain every choice.
- Explain why a laptop sticks to a far-away access point, and what changes that.